OpenPlant Orthographics Manager Help

Equipment and Nozzles

This page provide options to define the annotation preferences for equipment and nozzles. Equipment annotation is one of the items that can be place Internally and Externally.

Accessed by selecting the Annotations > Equipment and Nozzles node in the Settings interface.

Define the properties per the fields described below and Save the changes.

The Close icon closes the Project Settings interface, so make sure your changes are saved. You will be prompted to save them it you haven't already.

The Load Defaults icon in the main Settings interface will return the settings of the options page to their original values.

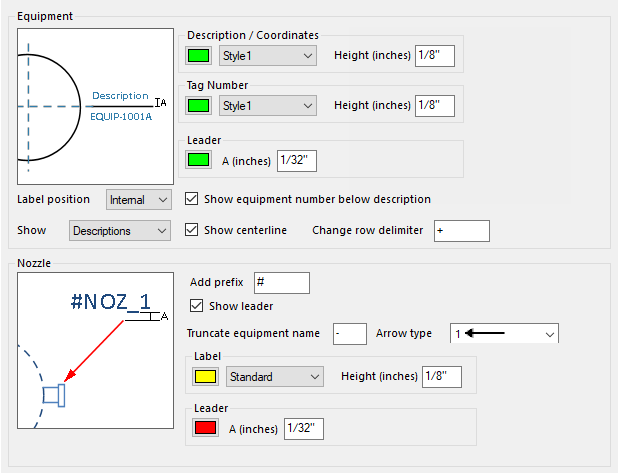
Equipment Annotation Options

SettingDescription
Description/Coordinates
Properties in this section define the display properties of the Description/Coordinates label.
  • Color: Click the icon and select a color from Color Table for the label text.
  • Text Type: Select a text type for the label from the drop down list. You can click the "..." option at the bottom of the list to display the Microstation Text Styles dialog allowing you to modify the text styles if desired.
  • Text Height: Enter a text height dimension into the field provided.
Tag Number
Properties in this section define the display properties of the Tag Number label.
  • Color: Click the icon and select a color from Color Table for the label text.
  • Text Type: Select a text type for the label from the drop down list. You can click the "..." option at the bottom of the list to display the Microstation Text Styles dialog allowing you to modify the text styles if desired.
  • Text Height: Enter a text height dimension into the field provided.
Leader Properties
Properties in this section define the display properties of the Leader line.
  • Color: Click the icon and select a color from Color Table for the label text.
  • Dimensions: Use the bitmap image to define the A dimension in inches/mm. If using a Diamond, Rectangular or Ellipse enclosure, an added B dimension must also be defined.
Label Position Choose whether the label position is Internal (inside the view area), or External (outside the view area).
Show
This option determines whether the Description or Coordinates will be displayed along with the Equipment tag number. The following options are available:
  • Description: The Equipment description will display under the tag number.
  • Coordinates: The Equipment placement coordinates will display under the tag number.
  • None: Only the Equipment tag number will display.
Show equipment number below description/coordinates

Toggles whether the Equipment tag number is displayed on top of the Description/Coordinates label, or below.

There are three options that can be selected depending what value was selected from the Show drop down list. (See below)
  • Descriptions: Show equipment number below description
  • Coordinates: Show equipment number below coordinates
  • None: Show equipment number only.

As you toggle this option, the bitmap will update dynamically so you can view the changes.

This option is only enabled when the Label position is set to Internal.

Show centerline Toggles whether the centerline is displayed on the equipment.
Change row delimiter

This option is usually used when only the Equipment tag number is displayed (The Show option is set to None).

The delimiter entered in this field is used to break the tag number where the delimiter is found and move the remaining tag characters to the next row (See example below):

EQP-U-S+12345-678

will display as:

EQP-U-S

----------

12345-678

if + is used as the Change Row delimiter.

Nozzle Annotation Options

SettingDescription
Add Prefix

Add a prefix character in the edit filed. Any character added will start the nozzle label.

(i.e. #Nozz-1)

Show Leader This option toggles the display of a leader line with the nozzle label. If enabled, a leader line will display with the label.
Truncate equipment name Define a delimiter character in the field to differentiate the equipment label from the nozzle label.
Arrow Type Select the arrow type to use for the leader line from the list of options.

The User Defined option displays the Select User Defined Arrow dialog letting you select an arrow symbol from a cell library.

Label Properties
Properties in this section define the display properties of the Tag Number label.
  • Color: Click the icon and select a color from Color Table for the label text.
  • Text Type: Select a text type for the label from the drop down list. You can click the "..." option at the bottom of the list to display the Microstation Text Styles dialog allowing you to modify the text styles if desired.
  • Text Height: Enter a text height dimension into the field provided.
Leader
Properties in this section define the display properties of the Leader line.
  • Color: Click the icon and select a color from Color Table for the label text.
  • Dimensions: Use the bitmap image to define the A dimension in inches/mm. If using a Diamond, Rectangular or Ellipse enclosure, an added B dimension must also be defined.